Turn your macOS app into a real business with licensing
You built something people want. Now learn how to add licensing to protect it from piracy, sell it and monetize it, distribute it to your customers, and get paid every time someone uses it.
No credit card required
How to sell your macOS app outside the App Store
You've built a macOS app worth selling, and you don't want Apple taking 30%. Selling outside the Mac App Store means you keep your revenue, own the customer relationship, and control your pricing. But it also means you need to handle licensing yourself. This guide covers the complete setup: from macOS code signing and notarization, to Swift license key validation, to Sparkle auto updates. By the end, you'll have:
- Payment integration with Gumroad, LemonSqueezy, or Stripe
- Native Swift license key validation using async/await and SwiftUI property wrappers
- Device limits so one license key can't be shared with 100 people
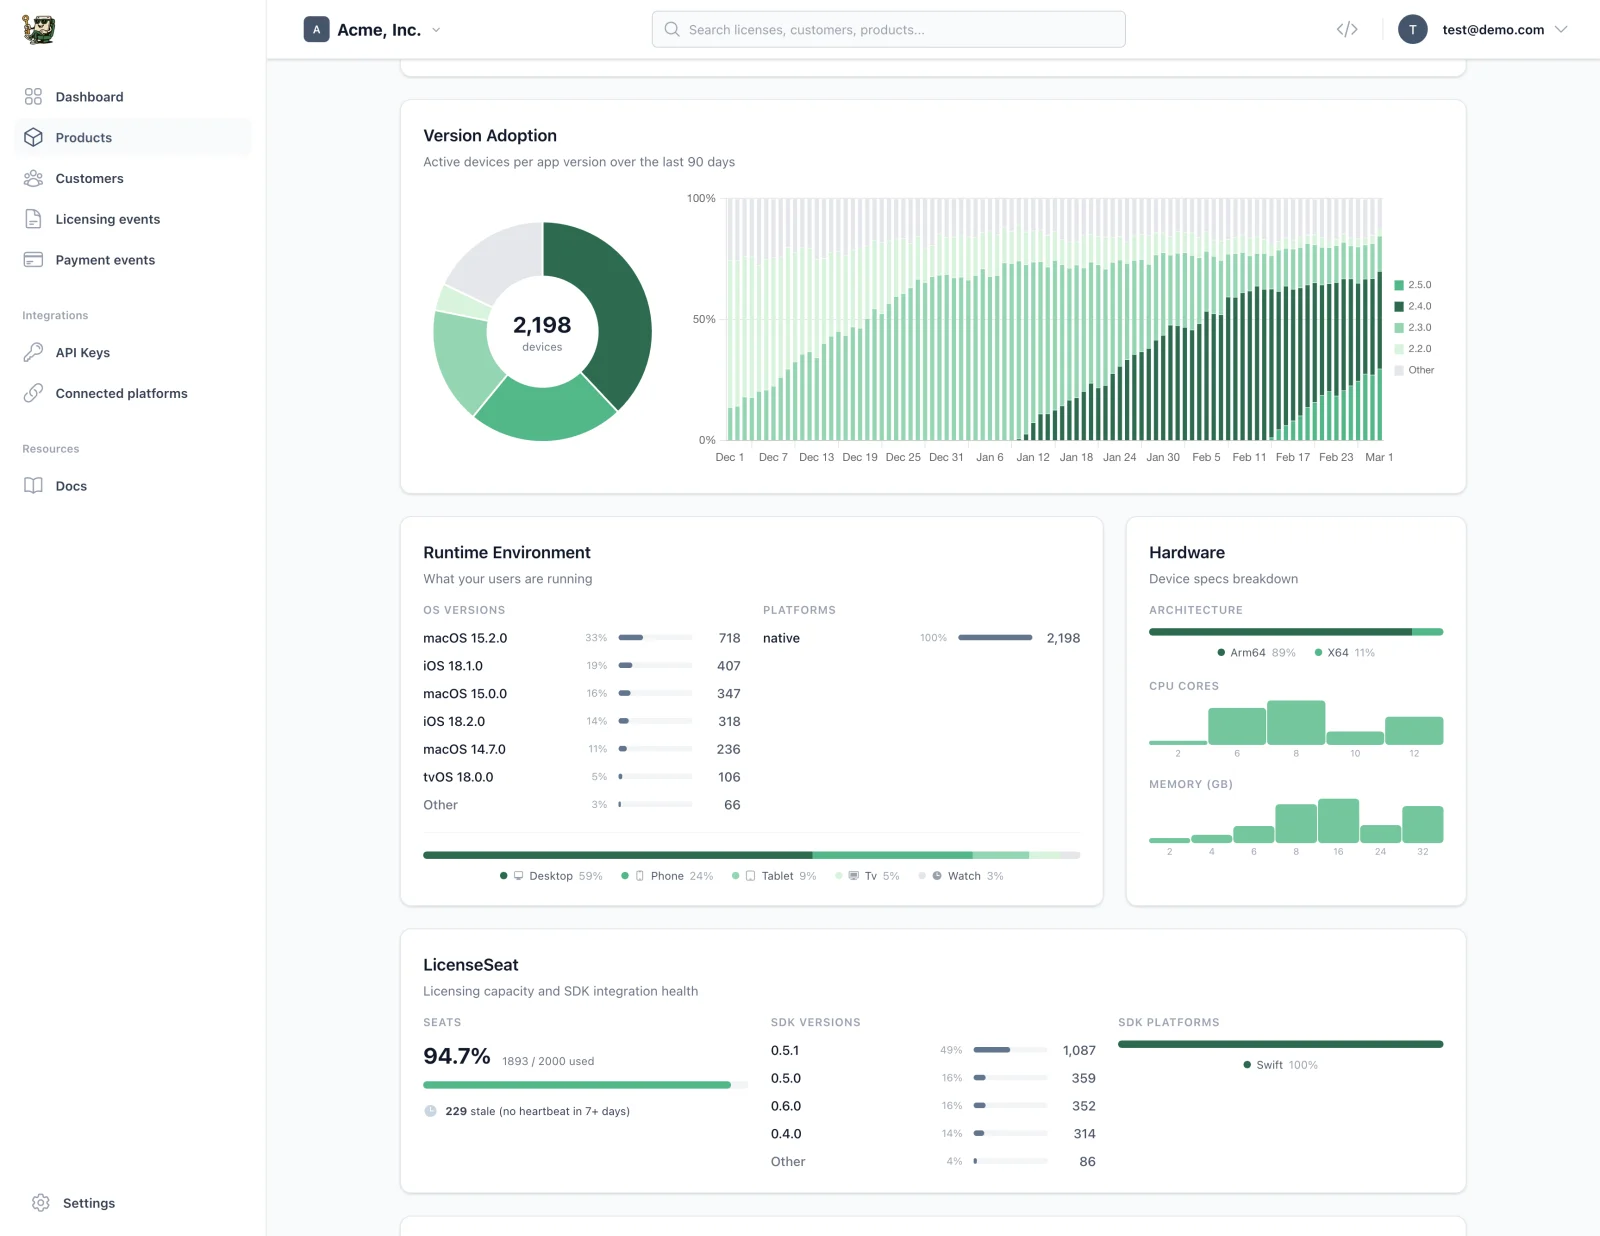
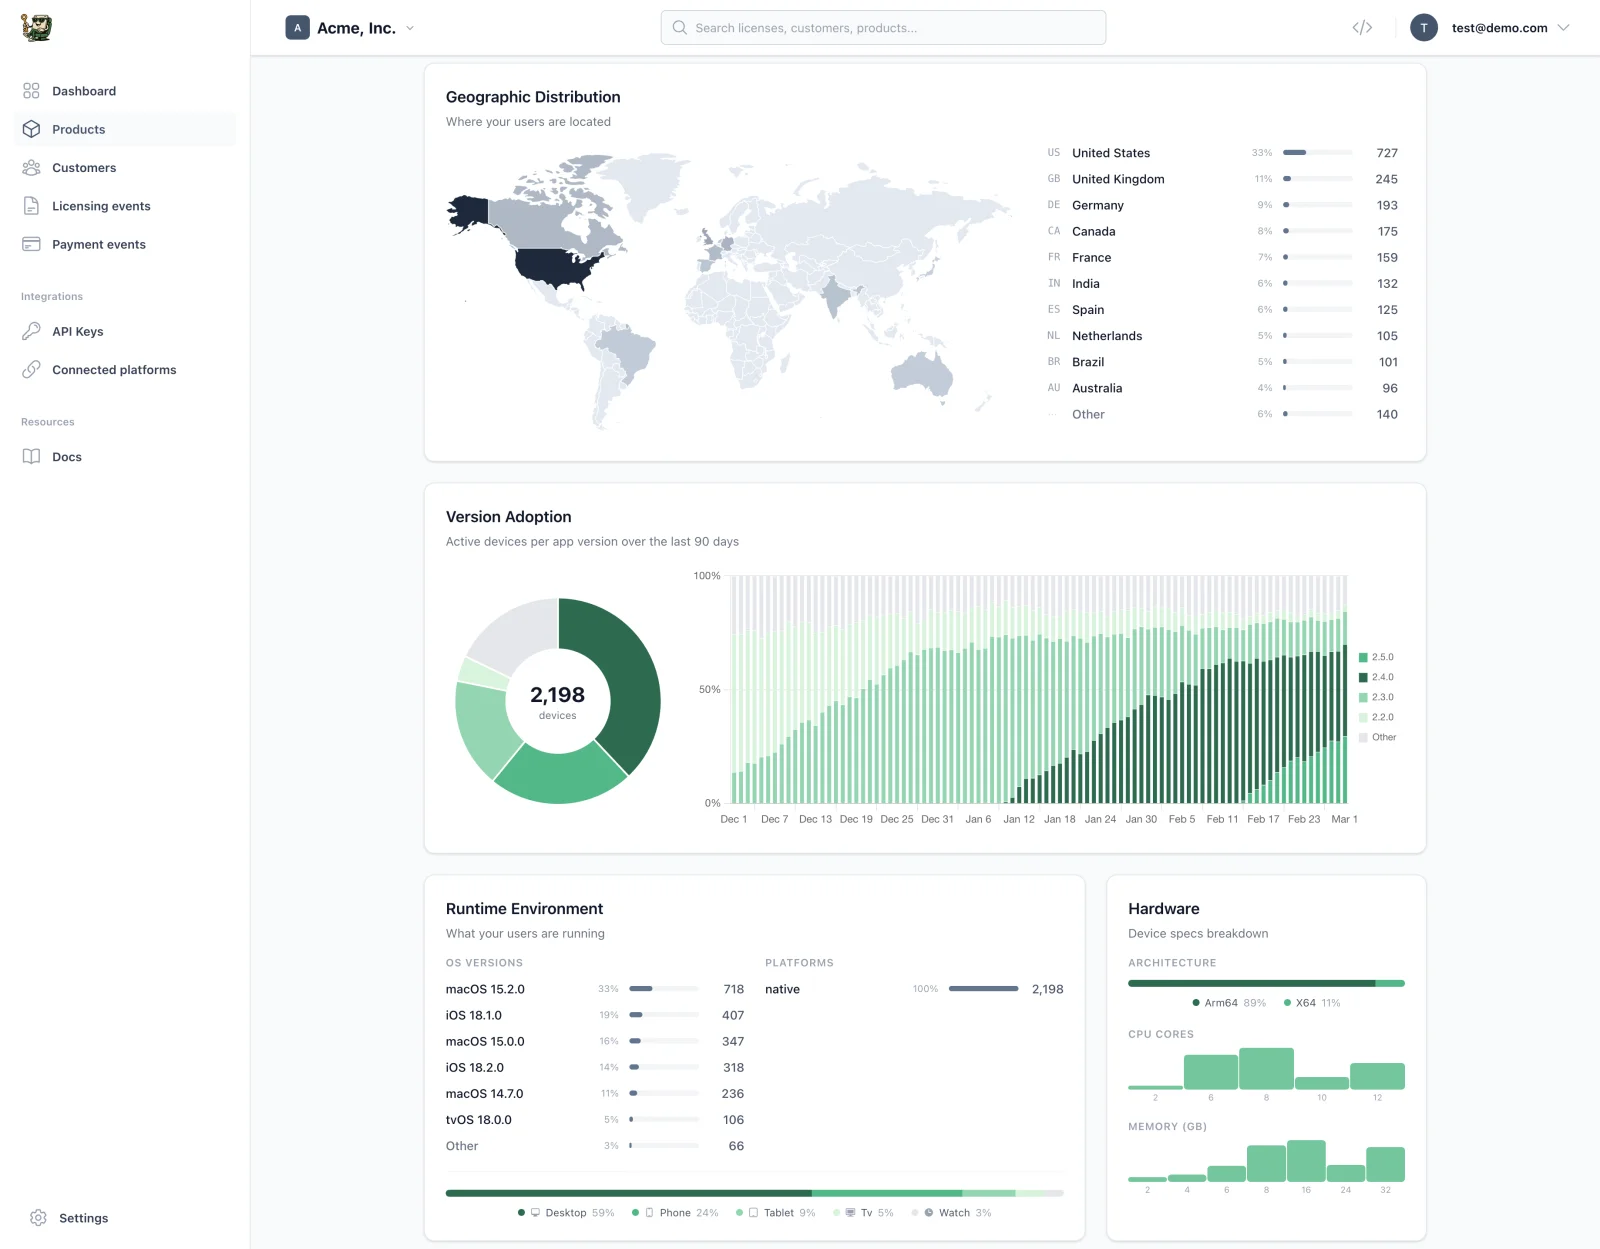
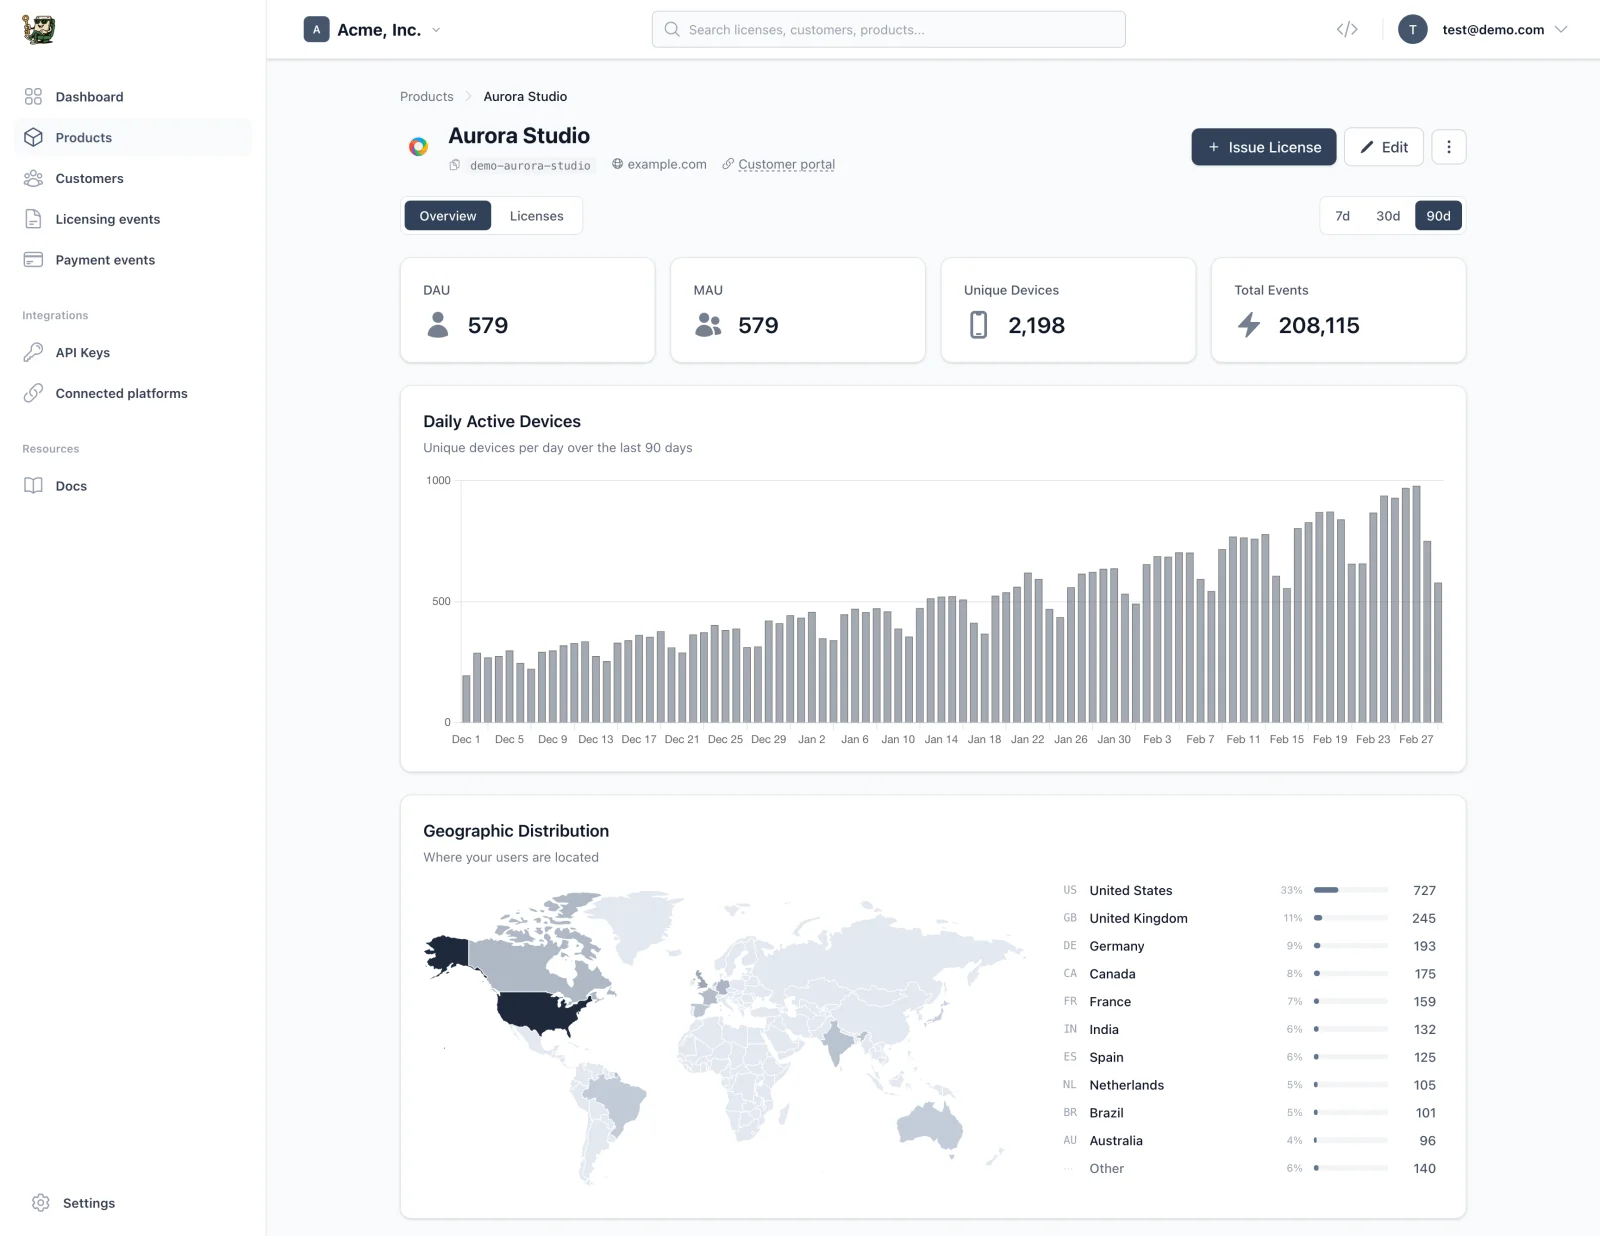
- Real-time dashboard showing who's using your app, on what macOS version, and where
- Sparkle auto update delivery gated to paying customers only
- macOS code signing and notarization so Gatekeeper doesn't scare your customers away
- DMG or PKG distribution with download links delivered automatically on purchase
No backend to build. No database to manage. Just a few lines of Swift to monetize your macOS app.
Once you're set up, you'll know exactly who's using your macOS app, where they are, and which version they're running, without writing any tracking code.
How licensing for macOS apps works
It's very simple! After each purchase, a macOS app license key gets issued and sent to your customer, automatically. If you want, we can also take care of your macOS app distribution. LicenseSeat handles all moving parts for you.
The technical details
You saw the flow above. Here's what's happening under the hood when you sell a macOS app outside the App Store.
Why sell outside the Mac App Store?
The App Store takes 30% (15% for small businesses). For a $49 app, that's $14.70 per sale gone. But more importantly, the App Store limits what your app can do:
| Mac App Store | Direct (outside App Store) | |
|---|---|---|
| Revenue share | 30% to Apple (15% small business) | 0% (you keep everything minus payment processing) |
| Sandboxing | Required (limits file access, networking) | Optional (full system access) |
| Pricing control | Apple's pricing tiers only | Any price, any model |
| Customer data | Apple owns the relationship | You own emails, usage data |
| Update review | Every update reviewed (1-7 days) | Ship updates instantly |
| Payment models | IAP rules, subscriptions only via Apple | Perpetual, subscription, floating, anything |
| System APIs | Restricted (no kernel extensions, etc.) | Full access |
Most successful indie macOS apps sell direct: Sketch, Nova, Tower, CleanShot X. They use perpetual licenses with optional renewal for updates.
Where the code lives
Licensing in a native macOS app is straightforward. Everything runs in Swift:
| Layer | Responsibility |
|---|---|
| Swift SDK (secure, compiled) | Validates license keys, stores activation in Keychain, handles offline caching with Ed25519 signatures |
| SwiftUI / AppKit (UI only) | Shows "enter license key" window, displays feature gates, reacts to license status changes |
All security-critical logic runs in compiled Swift. No JavaScript. No web views to bypass.
DIY vs. managed service
Build it yourself: Server, database, key generation, validation logic, device tracking, admin dashboard. 2-4 weeks + ongoing maintenance.
Use a service: Drop in a Swift SDK, call activate(), done. 30 minutes.
We'll use LicenseSeat because your time is better spent building your app. But the code patterns work with any licensing backend. The Swift SDK uses async/await, Combine publishers, and SwiftUI property wrappers — native macOS patterns you already know.
Choose where to sell your macOS app
Pick a payment platform. LicenseSeat integrates with all of them to automatically generate and deliver license keys when someone buys.


Plus: Shopify, FastSpring, Paddle, PayPal, and any platform with webhooks
Add licensing to your macOS app
LicenseSeat handles the hard stuff: secure key generation, device fingerprinting, offline validation, and abuse detection. You just add a few lines of Swift.
Connect your payment processor
Link Gumroad, Stripe, or any platform. New sales automatically trigger license creation.
Add the SDK to your macOS app
Drop in our Swift SDK. One activate() call is all you need.
Ship and get paid
Every purchase gets a unique license key. Every activation is tracked. You keep 100% of revenue.
macOS tutorial: Adding a license key to your Swift app
Here's the actual code. This tutorial walks through the complete setup for adding license key validation to a macOS app built with Swift and SwiftUI.
Step 1: Add the Swift package
In Xcode, go to File → Add Package Dependencies and enter:
https://github.com/licenseseat/licenseseat-swift
Or add it to your Package.swift:
dependencies: [
    .package(url: "https://github.com/licenseseat/licenseseat-swift", from: "0.4.1")
]
The SDK supports macOS 12+, uses async/await, and has zero third-party dependencies.
Step 2: Configure the SDK
In your App struct or AppDelegate, configure LicenseSeat on launch:
import SwiftUI
import LicenseSeat

@main
struct MyApp: App {
    init() {
        LicenseSeatStore.shared.configure(
            apiKey: "ls_live_your_api_key_here",
            productSlug: "your-product-slug"
        ) { config in
            config.autoValidateInterval = 3600      // Re-validate every hour
            config.heartbeatInterval = 300           // Heartbeat every 5 minutes
            config.offlineFallbackMode = .networkOnly // Offline fallback on network errors
            config.maxOfflineDays = 7                // 7-day offline grace period
            config.telemetryEnabled = true           // Anonymous usage stats
            config.debug = false                     // Console logging for development
        }
    }

    var body: some Scene {
        WindowGroup {
            ContentView()
        }
    }
}
What these settings do:
apiKey: Your LicenseSeat API key (get it from your dashboard)productSlug: Identifies which product this app belongs toautoValidateInterval: Recheck the license every hour (3600 seconds)heartbeatInterval: Send a ping every 5 minutes for real-time seat trackingofflineFallbackMode:.networkOnlyfalls back to the SDK's cached offline artifact on network errors. In the current Swift SDK, that artifact is still a signed offline token..alwaysuses offline fallback unconditionally.maxOfflineDays: Grace period for offline use (7 days recommended — laptops go offline)telemetryEnabled: Collect anonymous usage stats (macOS version, locale, architecture)debug: Enable console logging for development
Step 3: Add the license activation window
Here's a complete SwiftUI license activation view:
import SwiftUI
import LicenseSeat

struct LicenseActivationView: View {
    @State private var licenseKey = ""
    @State private var isLoading = false
    @State private var errorMessage: String?
    let onActivated: () -> Void

    var body: some View {
        VStack(spacing: 20) {
            Image(systemName: "key.fill")
                .font(.system(size: 48))
                .foregroundStyle(.secondary)

            Text("Enter your license key")
                .font(.title2)
                .fontWeight(.bold)

            Text("You can find your license key in the email you received after purchase.")
                .foregroundStyle(.secondary)
                .multilineTextAlignment(.center)

            TextField("M4C05-5W1FT-26", text: $licenseKey)
                .textFieldStyle(.roundedBorder)
                .frame(maxWidth: 300)
                .disabled(isLoading)

            Button(action: activate) {
                if isLoading {
                    ProgressView()
                        .controlSize(.small)
                } else {
                    Text("Activate")
                }
            }
            .buttonStyle(.borderedProminent)
            .disabled(licenseKey.trimmingCharacters(in: .whitespaces).isEmpty || isLoading)

            if let error = errorMessage {
                Text(error)
                    .foregroundStyle(.red)
                    .font(.callout)
            }

            Link("Don't have a license? Buy now",
                 destination: URL(string: "https://your-store.com")!)
                .font(.callout)
        }
        .padding(40)
        .frame(width: 420)
    }

    private func activate() {
        isLoading = true
        errorMessage = nil

        Task {
            do {
                try await LicenseSeatStore.shared.activate(licenseKey.trimmingCharacters(in: .whitespaces))
                onActivated()
            } catch let error as APIError {
                errorMessage = switch error.code {
                case "seat_limit_exceeded":
                    "This license is active on too many devices. Deactivate another device first."
                case "license_expired":
                    "This license has expired. Please renew."
                case "license_not_found":
                    "Invalid license key. Please check and try again."
                default:
                    error.message
                }
            } catch {
                errorMessage = "Network error. Please check your connection."
            }
            isLoading = false
        }
    }
}
Step 4: React to license status with SwiftUI
Use the @LicenseState property wrapper to reactively show different UI based on the license status:
import SwiftUI
import LicenseSeat

struct ContentView: View {
    @LicenseState private var status

    var body: some View {
        switch status {
        case .active, .offlineValid:
            MainAppView()
        case .inactive:
            LicenseActivationView { /* refresh */ }
        case .invalid(let message):
            VStack {
                Text("License issue: \(message)")
                Button("Re-enter license key") { /* show activation */ }
            }
        default:
            ProgressView("Checking license...")
        }
    }
}
The @LicenseState wrapper automatically subscribes to license changes. When the license is activated, revoked, or expires, your UI updates instantly.
Step 5: Feature gating with entitlements
Use entitlements for tiers (Free vs Pro) or time-limited update access. The most common pattern for macOS apps: a perpetual license with an updates entitlement that expires after 1 year. Customers keep the app forever but need to renew for new versions.
import LicenseSeat

struct FeatureGatedView: View {
    // Boolean shorthand — true if entitlement is active
    @EntitlementState("pro-features") private var hasPro

    var body: some View {
        if hasPro {
            ProEditorView()
        } else {
            BasicEditorView()
            Button("Upgrade to Pro") { showUpgradePrompt() }
        }
    }
}

// Programmatic check with detailed reason
func checkForUpdates() async {
    let status = LicenseSeatStore.shared.entitlement("updates")

    if status.active {
        // Check for updates via Sparkle 2
        updaterController.checkForUpdates(nil)
    } else {
        switch status.reason {
        case .expired:
            showRenewalPrompt(expiresAt: status.expiresAt)
        case .notFound:
            showUpgradePrompt()
        case .noLicense:
            showActivationPrompt()
        case nil:
            break
        }
    }
}
Step 6: Handling offline use
MacBooks go offline constantly — planes, coffee shops with bad wifi, corporate networks. The current Swift SDK handles this transparently with Ed25519-signed offline tokens. Machine files are the newer preferred offline artifact at the API level, but Swift has not migrated yet:
// Configure offline support
LicenseSeatStore.shared.configure(
    apiKey: "ls_live_...",
    productSlug: "my-mac-app"
) { config in
    config.offlineFallbackMode = .networkOnly  // Fallback on network errors
    config.maxOfflineDays = 7                  // 7-day grace period
}

// The current Swift SDK automatically:
// 1. Caches a signed offline token after activation
// 2. Verifies the token locally when offline (no network needed)
// 3. Checks token expiration, grace period, and clock tampering
// 4. Emits .offlineValid status so your UI can show an "offline" badge
// 5. Re-validates online when connectivity returns
Your users never get blocked. The .offlineValid status lets you show a subtle indicator without disrupting their workflow.
Listening to events (optional)
The SDK emits lifecycle events you can use for analytics, logging, or custom behavior:
import Combine

var cancellables = Set<AnyCancellable>()

// React to specific events
LicenseSeat.shared.eventPublisher(for: "license:revoked")
    .sink { event in
        showRevocationAlert()
    }
    .store(in: &cancellables)

// Track validation for analytics
LicenseSeat.shared.eventPublisher
    .filter { $0.name.hasPrefix("validation:") }
    .sink { event in
        Analytics.track(event.name, properties: event.dictionary ?? [:])
    }
    .store(in: &cancellables)
Distribute your macOS app with auto-updates
Host your builds on our global CDN, serve automatic updates, and gate downloads to paying customers. No S3 buckets to manage.
Upload once, serve everywhere
Upload your macOS app builds and we handle global distribution via CDN. Fast downloads for all your users.
Automatic updates
Sparkle-compatible release feeds for macOS. JSON manifests for custom updaters. Your users always get the latest version.
Gated downloads
Downloads require a valid license. No more sharing direct links. Cryptographically signed tokens ensure only paying customers get access.
What the LicenseSeat Swift SDK handles for you
You don't need to build any licensing infrastructure. The Swift SDK handles everything out of the box:
| Feature | Included | Configuration |
|---|---|---|
| Online license validation | ✓ | Automatic on activate/validate |
| macOS Keychain storage | ✓ | Automatic, persists across reinstalls |
| Device fingerprinting | ✓ | Automatic (hardware model, architecture, UUID) |
| Seat limits | ✓ | Set in your LicenseSeat dashboard |
| Offline grace period | ✓ |
maxOfflineDays in config (default: 0, set to 7 recommended) |
| Signed offline verification | ✓ | Current Swift SDK uses Ed25519-signed offline tokens |
| Entitlements (feature flags) | ✓ | Define in dashboard, check with @EntitlementState
|
| Background re-validation | ✓ |
autoValidateInterval (default: 1 hour) |
| Heartbeat for real-time tracking | ✓ |
heartbeatInterval (default: 5 min) |
| SwiftUI property wrappers | ✓ |
@LicenseState, @EntitlementState
|
| Combine publishers | ✓ |
statusPublisher, entitlementPublisher, eventPublisher
|
| Anonymous telemetry | ✓ | macOS version, architecture, locale (no PII) |
The defaults are sensible. Most macOS apps ship with just the API key and product slug configured. Tweak settings later based on real user feedback.
macOS app distribution and Sparkle auto updates
LicenseSeat handles distribution for your macOS app. When a customer purchases, they get a download link and license key automatically. For updates, gate them behind the updates entitlement (shown in the code section above) so expired licenses keep the version they paid for but don't receive new releases.
The Sparkle framework is the standard for macOS auto updates. Integrate it with your entitlement checks: call entitlement("updates") before checking for updates, and show a renewal prompt if the entitlement has expired. LicenseSeat provides Sparkle-compatible release feeds so your users always get the latest version.
How successful macOS apps do licensing
Sketch: The design tool that defined the Mac-first approach. Originally $99 perpetual, now offers both subscriptions ($12/month or $120/year per editor) and a $120 Mac-only perpetual option. Uses a custom licensing system with device activation.
Nova (by Panic): Code editor at $99 with 1 year of updates included. Renewal at $49/year. Classic perpetual + renewal model. Built custom licensing for their entire app lineup.
Tower: Git client at ~$69/year (Basic) or ~$99/year (Pro) subscription. Uses a custom licensing system with seat-based activation for teams.
CleanShot X: Screenshot tool at $29 one-time plus $19/year for updates. Sold through Gumroad. Uses Paddle for licensing (before Paddle dropped native license key support in Paddle Billing).
The DIY licensing trap: Every one of these apps either built custom licensing infrastructure or relies on Paddle (which dropped native license key support in Paddle Billing). That means weeks of development time: building servers, databases, key generation, validation endpoints, device tracking, admin dashboards. And ongoing maintenance forever. The LicenseSeat Swift SDK gives you all of that — plus offline validation with Ed25519 signatures, automatic heartbeats, entitlements for feature gating, SwiftUI property wrappers, and stable device fingerprinting — in ~10 lines of code. Ship your app, not your licensing infrastructure.
The common pattern: Perpetual license ($29-99 one-time) with optional yearly renewal for updates ($19-49/year). 2-3 device limit. This model works because macOS users expect to own their software and because developers get recurring revenue from power users who want the latest features.
Common patterns:
- Price range: $29-99 one-time, or $5-15/month subscription
- Most use perpetual licenses with update renewal (the Sketch/Nova model)
- 2-3 device limit is standard (iMac + MacBook)
- Trial periods of 14-30 days are common
Common macOS app licensing mistakes
These are common pitfalls when licensing macOS apps distributed outside the App Store, and how the LicenseSeat SDK handles each one for you.
Relying on App Store receipt validation. If you're selling outside the App Store, you don't get receipts. You need your own license key system. → The LicenseSeat SDK gives you license key validation that works completely independently of the App Store.
Storing license data in UserDefaults or plain files. Anyone can edit ~/Library/Preferences/. Trivial to bypass. → The SDK stores activation data in the macOS Keychain, encrypted at rest and protected by the OS. Tamper-resistant by design.
Blocking users who go offline. MacBooks get used on planes, in coffee shops, on unreliable networks. A licensing system that requires constant internet will frustrate your users. → The current Swift SDK caches signed offline tokens. Set maxOfflineDays: 7 and your users can work offline for a week without interruption while the Swift SDK catches up to the newer machine-file model.
Skipping macOS code signing and notarization. Without code signing, Gatekeeper shows "this app can't be opened because it is from an unidentified developer." Most users will trash your app. → Code signing is required (see requirements below). The LicenseSeat SDK itself is fully signed and notarized.
Shipping a DMG without any licensing. Even basic license keys stop the vast majority of casual sharing. → The SDK gives you software activation in a few lines of Swift. No excuse to ship unprotected.
Forgetting deactivation UX. Users buy a new Mac. They need to move their license. If there's no way to deactivate the old device, they'll email support. → The SDK provides deactivate() and the dashboard lets users manage their own devices. Self-service, zero support tickets.
Obsessing over determined pirates. Perfect DRM doesn't exist. If someone wants to crack your app badly enough, they will. → The SDK makes buying easy and pirating annoying. That's the 95% solution. Don't over-engineer this. Focus on delighting paying customers.
macOS app distribution requirements
macOS code signing and notarization requirements
Before you distribute your macOS app outside the App Store, you need code signing and notarization. Without them, Gatekeeper blocks your app and users see scary warnings that kill conversion.
Code signing
You need an Apple Developer Program membership ($99/year) and a Developer ID Application certificate:
- Enroll at developer.apple.com
- In Xcode → Settings → Accounts, add your Apple ID
- Create a Developer ID Application certificate in Keychain Access or the Apple Developer portal
- In your Xcode project, set Signing & Capabilities → Signing Certificate to "Developer ID Application"
Without this, your app shows "can't be opened because it is from an unidentified developer" and most users won't know how to bypass it.
Notarization
Apple notarization is a mandatory security scan. You submit your app to Apple's automated review, and they attach a "ticket" that tells Gatekeeper the app is safe:
- Archive your app in Xcode (Product → Archive)
- Notarize using
notarytool:
# One-time setup: store your credentials in Keychain
xcrun notarytool store-credentials "AC_PASSWORD" \
    --apple-id "[email protected]" \
    --team-id "YOUR_TEAM_ID" \
    --password "your-app-specific-password"

# Submit for notarization
xcrun notarytool submit MyApp.dmg \
    --keychain-profile "AC_PASSWORD" \
    --wait

# Staple the ticket to your DMG
xcrun stapler staple MyApp.dmg
Notarization typically takes 1-5 minutes. Once stapled, your app opens without any Gatekeeper warnings, even on first launch. This is critical for conversion — users who see warnings rarely continue with the install.
DMG vs PKG: Which format to ship
Both work for distributing macOS apps outside the App Store:
| Format | Best for | Pros | Cons |
|---|---|---|---|
| DMG (disk image) | Simple apps | Drag-and-drop install, familiar to Mac users, smaller size | No custom install scripts, no /usr/local/ components |
| PKG (installer package) | Apps with helpers | Custom install locations, pre/post-install scripts, background services | More complex to build, less "Mac-like" |
Most indie macOS apps use DMG. It's simpler, users know the drag-to-Applications flow, and it's easier to build. Use PKG only if you need to install helper tools, launch daemons, or system extensions.
Tools to build DMGs: - create-dmg: CLI tool, creates pretty DMGs with backgrounds and icon positioning - Xcode: Archive → Export → Developer ID → DMG - dmgbuild: Python tool for scriptable DMG creation
Sparkle framework for auto updates
Sparkle is the standard macOS auto update framework. It handles checking for updates, downloading, verifying signatures, and installing — all in the background.
- Add Sparkle via Swift Package Manager:
https://github.com/sparkle-project/Sparkle - Add
SPUStandardUpdaterControllerto your app - Host an appcast XML file with your release info
- LicenseSeat provides Sparkle-compatible release feeds, or host your own
Gate updates behind your updates entitlement so users with expired licenses keep the version they paid for:
// In your "Check for Updates" menu action
let updaterController = SPUStandardUpdaterController(
    startingUpdater: true, updaterDelegate: nil, userDriverDelegate: nil
)

func checkForUpdates() async {
    let status = LicenseSeatStore.shared.entitlement("updates")
    if status.active {
        updaterController.checkForUpdates(nil)
    } else {
        showRenewalPrompt()
    }
}
macOS-specific requirements
Xcode: 15.0+ (for Swift 5.9+ and async/await support)
Swift version: 5.9+ (the SDK uses modern concurrency)
macOS minimum deployment target: macOS 12.0+ (Monterey)
Keychain access: The LicenseSeat Swift SDK stores activation data in the macOS Keychain. No special entitlements needed — Keychain access is available to all macOS apps, including sandboxed ones.
Hardened Runtime: Required for notarization. Enable in Xcode → Signing & Capabilities → Hardened Runtime. The SDK is compatible with all Hardened Runtime restrictions.
Summary: How to sell a macOS app outside the App Store
To recap how to monetize your macOS app with direct distribution:
- Get code signing: Enroll in the Apple Developer Program ($99/year) and create a Developer ID certificate
- Set up payments: Connect Gumroad, LemonSqueezy, or Stripe to generate license keys on purchase
- Add the LicenseSeat Swift SDK:
https://github.com/licenseseat/licenseseat-swift - Validate on launch: Use
@LicenseStatein SwiftUI to react to license status - Gate features: Use
@EntitlementStateto control access to Pro features or updates - Notarize your build: Submit to Apple via
notarytooland staple the ticket - Package as DMG: Use create-dmg for a polished drag-and-drop installer
- Add Sparkle: Set up auto updates gated behind the
updatesentitlement - Distribute: Host your builds on LicenseSeat's CDN or your own server
That's the complete flow for selling a macOS app outside the App Store. You're now ready to ship and get paid.
More than just license keys
LicenseSeat gives you everything you need to protect and sell your macOS app.
Stop losing sales to piracy
Pirates are stealing up to 20% of your launch revenue. Most indie macOS apps get cracked in the first week. LicenseSeat adds friction and control, without hurting honest users.
- Prevent key sharing & license abuse
- Enforce per-device or per-seat limits
- Revoke stolen or abused keys instantly
- Offline activation supported

Integrate with your existing payment processor
We connect and integrate with your payment system (Gumroad, Stripe, PayPal, Paddle, etc.) to automate license issuance upon purchase, automatically delivered to your users via email. No markup, 0% revenue share.
- Connect with Stripe, Gumroad, PayPal, Paddle & more
- Webhooks and API for custom integrations
- No-code setup with Zapier
- Zero revenue share or markup fees

Start selling your macOS app today
Add licensing in 15 minutes. Protect your code, deliver license keys automatically, and get paid. Start your free trial in seconds—no credit card required.
Start free trial